pinning

All posts tagged pinning

Been a while since I’ve updated; there have been a lot of happenings around here, and unfortunately, very few of them Titan-related.

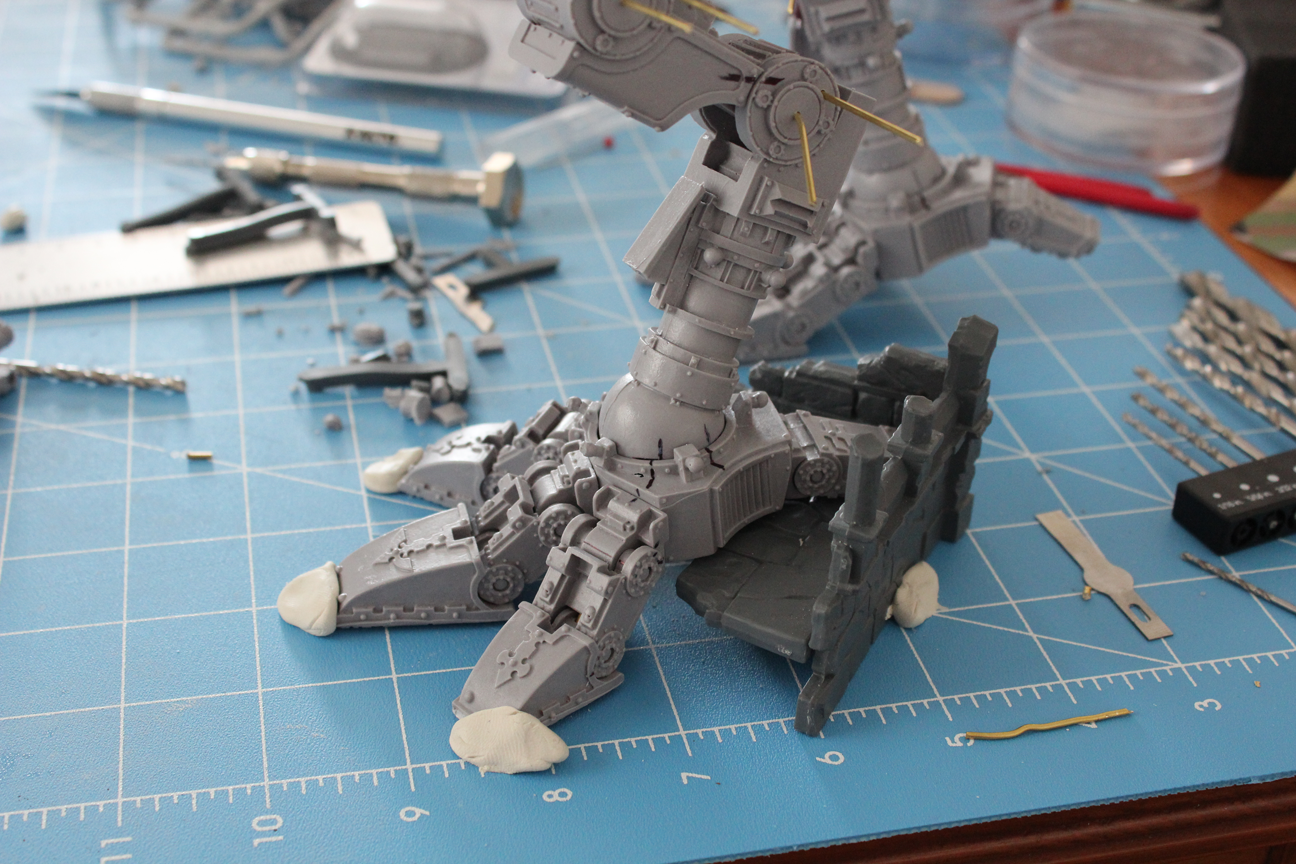
It looks like I forgot to take pictures of the feet epoxying part.  Fortunately, it was relatively straightforward: I just put a bunch of JB weld in the joints and around the pins, then put the toes on and made sure there was plenty of it in all the sockets, then placed the foot in its posed position, and let it sit there for 24 hours to cure.  Only the left foot needed epoxying, the right foot was already pinned and superglued with the exception of one pin on the rear toe.  I just left that one upside down to cure.

Next up I epoxied the legs.  Looks like I didn’t take any during pictures of this either.  I seem to remember thinking something to the effect of it being straight-forward, so I didn’t need to take any pictures of it.  That’s irritating, because there were a lot of those situations in everyone else’s blogs that I looked at before starting my titan, and the parts that seemed straightforward to them were never straightforward to me.  And it kind of defeats the purpose of this blog a bit that I did that…

I’ll try to make up for it with description.  After mixing up the JB weld, I started in the knee joints; note that the piston on the rear of the thigh needs to be cut to size before you do this part.  If you’ve got pins in this joint, you’re not going to be able to fit the piston up into its slot after epoxying/inserting the pins.  So you need to have it measured and in place before you actually start epoxying the joints.  I had originally planned to use superglue for these because I could, but it occurred to me that while I was getting the rest of the joint in place the superglue would set before I was done, leaving me with a likely out-of-place and set piston.  No bueno, so I just decided to use JB weld on it too, which was fine; with the way the thigh pistons are slotted, it’s not going to be going anywhere once the rest of the knee joint is posed.

Doing the actual epoxying was a fairly simple matter.  Just score the inside of the joints with a sharp Xacto knife or something (provides some friction for the epoxy to grab on better) and then smear it on the inside of the joint, then repeat for the thigh piece.  I also put some down into the pin holes a bit.  However, I was using a toothpick, so I couldn’t get it that far down in there. After that, stick the pieces together, try to avoid epoxy-smearing, and then stick the pins into their holes. It turned out for me that the pins pushed a lot of their epoxy out the other end when I got them all the way in.  I used a handy toothpick to make sure they were roughly centered in their holes, wiped excess epoxy off with a paper towel, and moved on to the next joint.  Repeat for each joint on each leg.  Once that was done, I stuck them in their respective feet and left them to cure for 24 hours.  Note that the ankle joints were not epoxied yet at this point.

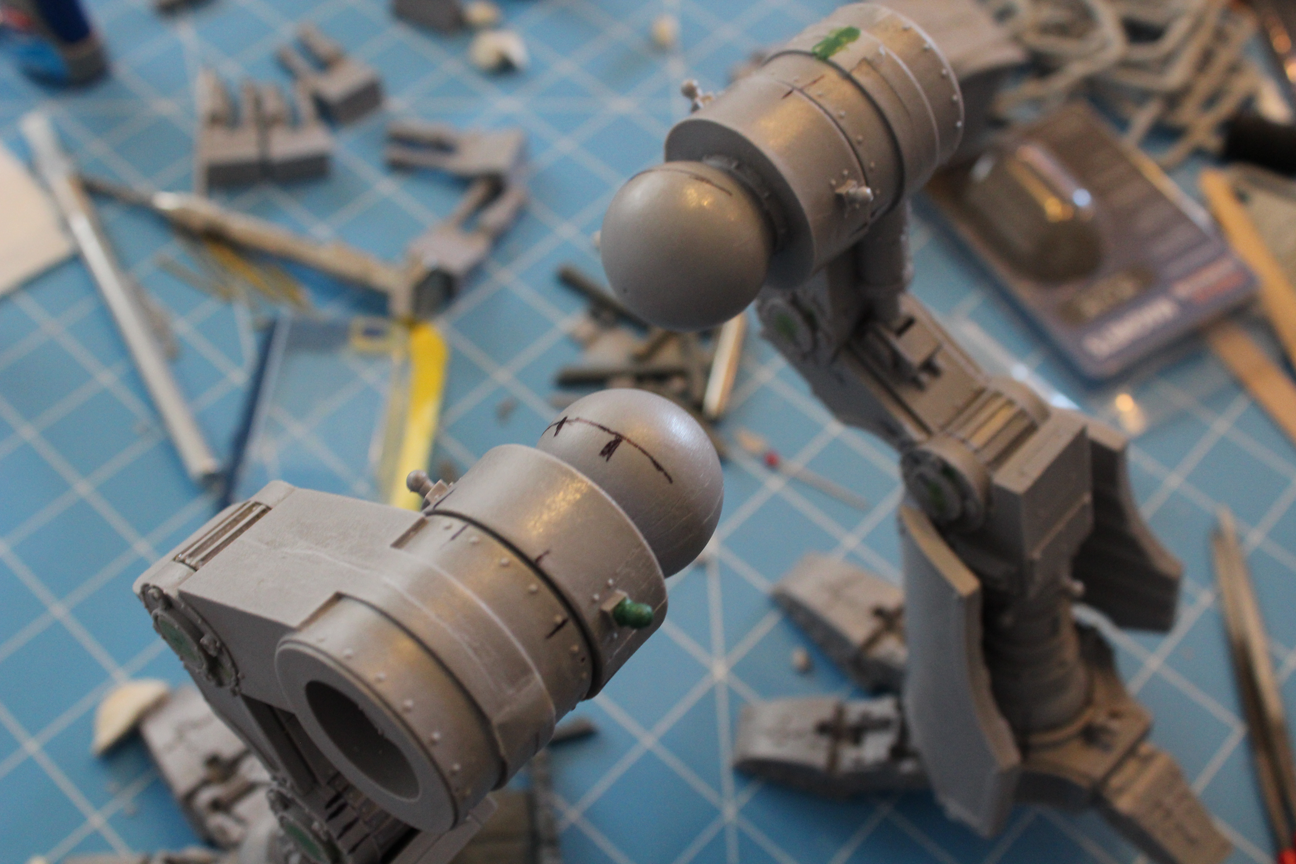
Once that was done, I did the hip joints and got them in their properly marked positions, epoxied and that was it.  Here’s a picture post green stuffing (which happened after).

legsGreenStuffedBallsMarked

Continue Reading

On to the main body. It took me some time to get this part figured out. A few things I noticed while doing the endless dryfitting– no really, I spent like 2 days dryfitting these before deciding exactly where to put pins as well (granted they were work days, so more like 2 evenings)– first, the sides of the back did not fit well with the middle of the back (the reactor).  I couldn’t get the boxes on the sides to fit flush with the spaces in the reactor piece.  I spent a lot of time fiddling with these and trying to find out why they didn’t fit properly.  Turns out that the side pieces have a small nub of resin sticking out that is supposed to go into the corner of the reactor piece.

mainBodyLeftNubCircled

These nubs have to be lined up properly in order for the side piece to sit flush with the side of the reactor, but when you get it lined up in the corner of the reactor room, the boxes on top and bottom don’t line up at the same time.  According to the blog linked in my last post, this is pretty common to all Warhounds.  I also discovered that the floor of the reactor was going to be very difficult to line up properly with the front of the main body.  Eventually I just decided that I was going to have to do my best and then fill in the gaps with green stuff.  I wasn’t willing to make the cuts necessary to make some of this stuff fit; and in truth I wasn’t sure it would work.  I didn’t want to cut too much and find I’d screwed up the model.

Anyway, on to the pinning.  As you can see in the above picture, I did some more sharpie marking to find pin hole positions.  I didn’t want to drill the large 1/8″ pins all the way through the body so they’d be visible from the outside, so that meant I needed to mark out the pin holes because I’d have to drill them separately. I did this by marking with the sharpie where the back edge of the reactor met the side piece.  Then, I chose a spot that looked good on the reactor piece and drilled.  From there, I used a ruler to measure how far from the corners the edge of the hole was.

reactorSideMeasurePoints

Then, with the edge markings I’d made on the side piece, I could mark the edges of the hole on it, then drill.  As you can see in the first picture, I didn’t get the location quite right on the first one.  It fit almost perfectly when it was the first hole, but once I fitted the second side piece to the reactor, the fit wasn’t as perfect.  I also found that the sides of the reactor are slanted slightly; they’re not straight up and down.  The side pieces are pretty close, so you need to decide which is going to be “flat” for your pin.  I ended up drilling more or less straight into the slanted face of the reactor piece (90 degrees perpendicular to the plane of the side where the measurements were taken).  That would put the pin poking at a downward angle into the side piece, which required a bit of a hole adjustment.  I figured no problem, the epoxy would need some space to hold the pin in.

Continue Reading

I did a fair amount of research before starting on this project.  I’d been thinking about it for several months before I finally worked up the nerve to spend the money on the model.  I’ve always dreamed of having a Titan, and now I’ve got one, I don’t want to screw it up.  I knew going into this that it would put all of my modeling skills to the test in addition to forcing me to develop new ones.  Well, so far I certainly haven’t been wrong.  I made a few mistakes, but so far I’ve been able to correct all of them (or at least mitigate them).  I’m going to include some pictures below of what I did along with my thoughts on the approach.

After doing a bunch of looking around, I decided I wanted a dynamic pose.  A straight up and down pose would be easier, but frankly, I think a lot of the flat-footed poses look kind of boring.  If this is going to be a centerpiece model for my collection, I want it to look good.  Eventually I decided that it would look really cool to have the Titan prowling through some ruins as if hunting some elusive enemy.  It took forever to find the ruins that I eventually decided to use.  I had initially planned to have it stepping onto the ruins, perhaps with the toes, but once I got some feasible ruins, I found that it was not likely to be a natural-looking pose with just the toes on the piece, so I decided I’d have the Titan stepping over the ruins as if it were just putting its heel down on the other side of a smashed wall.  The ruins come from GW’s Ruins of Osgiliath set.  I’m only using one of the pieces right now; the rest are either going to end up on the base or on my table as terrain.

So, first things first: get the feet done.  Starting with the left foot, I spent a ton of time dry fitting (not kidding here, I spent like 2 days dry fitting and trying different poses) for just the foot.  I used a bit of poster sticky-tac (not sure if that’s the real name or just what everyone around here calls it) to hold bits in position.

leftLegAssembledPins

Continue Reading