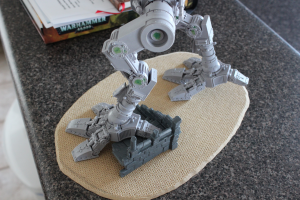
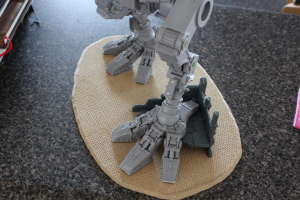
More stuff in the Warhound building! I worked on the base a bit a few days ago. I’ve seen a few people use large cutting boards, CD/DVDs, or other stuff for their titan bases. I wanted something bigger than a couple of CDs but not as big as a cutting board, so I decided to get some hardboard from the hardware store and cut my own base out of it. I just placed the titan’s legs onto the base and pencil-drew a rough rounded shape around the feet at about the size I wanted. After that, I cut it out with the drywall bit on my dremel, then sanded down the edges and put a bevel on it with the drum sander.
The drywall bit gave me a fairly wobbly cut around the edge I wanted (it was my first time using it, this has been a project of firsts), but I was able to sand it down to smooth enough for my purposes. I don’t necessarily want it to look like it’s a perfectly rounded base; a little unevenness gives it a bit of a “this was torn out of the ground where the titan was walking and frozen in time” look (besides, I don’t think I can get it perfectly rounded…).
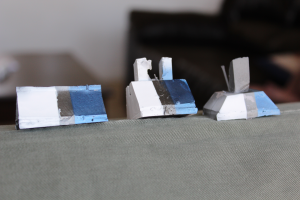
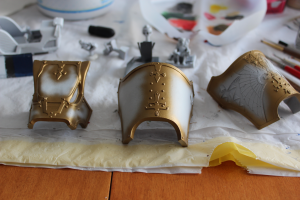
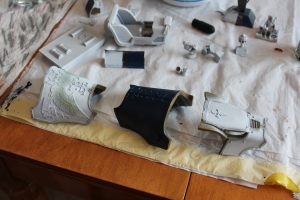
Then I did some paint tests in trying to figure out the paint scheme I want to use.
These are just some gates that I cut off the titan pieces. The one on the left is black primer, the middle is white primer, and the right one is gray primer. In this picture I was considering doing a blue/black or a blue/white color scheme. I eventually decided on the latter, because the blue and the white are nice contrasting colors. I’m a sucker for blue schemes, it’s always been my favorite color.
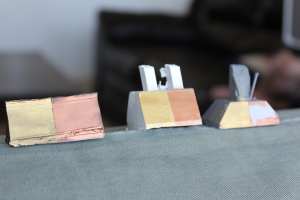
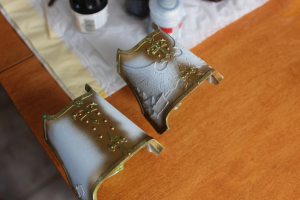
Later on the weekend I started doing the actual airbrushing, after priming some pieces with the white primer. I figured it would give me some advantages in the areas the white would be. So, first thing to do was airbrush the trim on the pieces. I decided to use a liquid masking fluid (another first) for the more detailed parts of the pieces I was doing. I’m not that great with masking tape, and just don’t have the patience to work with it when I know I’m not going to be able to get the kind of coverage I need.
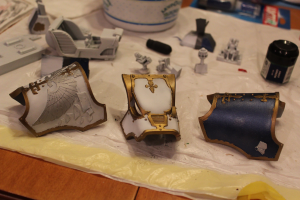
In the left-most picture you can see the gold has been airbrushed on. On the right picture, you can see the liquid mask drying on the gold. I bought some Utrecht brand masking medium, because for some reason they were the only store I could find in my area that carried any liquid mask at all. Then when I got there, they had multiple brands, but their own brand was the only one that had a color to it. Working on the advice of some Youtube videos, I decided to go with the colored stuff because it would be easier to see when I was done painting. I’m glad I did. As you can see in the right picture, it’s kind of hard to see when it’s dry. In the picture, the entire trim is masked, you can only really see it well in the parts where it isn’t dried yet.
A note on this: I tried to get the mask down the sides of the trim, which turned out to not be a great idea. It’s recommended to use a paintbrush that you’re not greatly fond of for this stuff; it’s basically liquid rubber and dries up in the bristles causing all kinds of nastiness. I was using a synthetic fiber brush I had from when I was about 10 and it was not very accurate, especially as the liquid mask started to dry inside the bristles. More info later on the consequences of trying to do the small edges on the inside lip of the trim with a not-detailed brush. Also, since we’re on the topic of using a brush you’re not fond of, the synthetic brush worked great for re-usability. After about 5 or 10 minutes of brushing this stuff on, it starts to get pretty gross and your brush gets noticeably fatter. The synthetic hair was nice because I could run the bristles under hot water and pick them fairly aggressively without being worried about ruining them. So just run the brush under hot water, apply some hand soap, and then rub the bristles back and forth between your thumb and forefinger and the stuff comes right out. Then back to the table to mask some more.
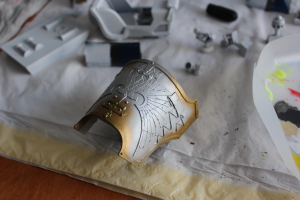
From left to right, applied the silver to the Aquila on the shin guard, applied generous amounts of mask to the eagle (this time not trying to get the outer raised edges), and white/blue applied, which are the final main colors.
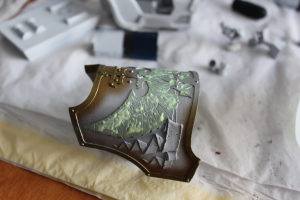
Lastly, you want to get this stuff off relatively quickly (like I have read that leaving it on for more than 24 hours is not good). The longer it stays on, the more it bonds with the paint (which is Bad). You get it off by rubbing your fingers across it, or if it’s really stubborn, you can grab at raised edges with tweezers. The rubbing turned out to be a bit of a problem with the blue shin guard, since that color was particularly susceptible to rubbing and finger oils. Here’s the result of pulling it off.
I have to say, I was really happy with how it turned out. That said, there were some issues. Enter the consequences of my attempt to get the liquid mask onto the inner edges of the outer trim. You can see on the right shin guard, and a bit on the head piece what happened. The mask had gotten out into the main part of the piece farther than I had anticipated, and as I pulled it off, the paint came off in small ribbons as well. I wasn’t terribly happy about that, but all in all, first time using the liquid mask, it’s not too bad. I was able to repair the damage without too much trouble (except the white… it caused some headaches).
I’ll be posting some more pictures here before too long, but things are going slowly as I work my way through the painting. There are a lot of details on this thing, and I’ve already dumped probably 30 hours into just these three pieces alone (they’re quite a bit farther along by now than these pictures show; I just haven’t taken any new ones yet since they aren’t done). I will probably post fewer painting pictures until it’s all done. I’m to the point where I’m working on it an hour or so a night and just making small bits of progress at a time.
In the next post, I will hopefully have fully figured out the base. I ended up buying a strip of decorative tile at the local Home Depot and tore that apart to get ruined building and paving stones.
